7.11 Git 工具 – 子模块
子模块
有种情况我们经常会遇到:某个工作中的项目需要包含并使用另一个项目。 也许是第三方库,或者你独立开发的,用于多个父项目的库。 现在问题来了:你想要把它们当做两个独立的项目,同时又想在一个项目中使用另一个。
我们举一个例子。 假设你正在开发一个网站然后创建了 Atom 订阅。 你决定使用一个库,而不是写自己的 Atom 生成代码。 你可能不得不通过 CPAN 安装或 Ruby gem 来包含共享库中的代码,或者将源代码直接拷贝到自己的项目中。 如果将这个库包含进来,那么无论用何种方式都很难定制它,部署则更加困难,因为你必须确保每一个客户端都包含该库。 如果将代码复制到自己的项目中,那么你做的任何自定义修改都会使合并上游的改动变得困难。
Git 通过子模块来解决这个问题。 子模块允许你将一个 Git 仓库作为另一个 Git 仓库的子目录。 它能让你将另一个仓库克隆到自己的项目中,同时还保持提交的独立。
开始使用子模块
我们将要演示如何在一个被分成一个主项目与几个子项目的项目上开发。
我们首先将一个已存在的 Git 仓库添加为正在工作的仓库的子模块。 你可以通过在 git submodule add 命令后面加上想要跟踪的项目 URL 来添加新的子模块。 在本例中,我们将会添加一个名为 “DbConnector” 的库。
$ git submodule add https://github.com/chaconinc/DbConnector
Cloning into 'DbConnector'...
remote: Counting objects: 11, done.
remote: Compressing objects: 100% (10/10), done.
remote: Total 11 (delta 0), reused 11 (delta 0)
Unpacking objects: 100% (11/11), done.
Checking connectivity... done.
默认情况下,子模块会将子项目放到一个与仓库同名的目录中,本例中是 “DbConnector”。 如果你想要放到其他地方,那么可以在命令结尾添加一个不同的路径。
如果这时运行 git status,你会注意到几件事。
$ git status
On branch master
Your branch is up-to-date with 'origin/master'.

Changes to be committed:
  (use "git reset HEAD <file>..." to unstage)

	new file:   .gitmodules
	new file:   DbConnector
首先应当注意到新的 .gitmodules 文件。 该置文件保存了项目 URL 与已经拉取的本地目录之间的映射:
$ cat .gitmodules
[submodule "DbConnector"]
	path = DbConnector
	url = https://github.com/chaconinc/DbConnector
如果有多个子模块,该文件中就会有多条记录。 要重点注意的是,该文件也像 .gitignore 文件一样受到(通过)版本控制。 它会和该项目的其他部分一同被拉取推送。 这就是克隆该项目的人知道去哪获得子模块的原因。
NOTE
由于 .gitmodules 文件中的 URL 是人们首先尝试克隆/拉取的地方,因此请尽可能确保你使用的URL 大家都能访问。 例如,若你要使用的推送 URL 与他人的拉取 URL 不同,那么请使用他人能访问到的 URL。 你也可以根据自己的需要,通过在本地执行 git config submodule.DbConnector.url <私有URL> 来覆盖这个选项的值。 如果可行的话,一个相对路径会很有帮助。
在 git status 输出中列出的另一个是项目文件夹记录。 如果你运行 git diff,会看到类似下面的信息:
$ git diff --cached DbConnector
diff --git a/DbConnector b/DbConnector
new file mode 160000
index 0000000..c3f01dc
--- /dev/null
+++ b/DbConnector
@@ -0,0 +1 @@
+Subproject commit c3f01dc8862123d317dd46284b05b6892c7b29bc
虽然 DbConnector 是工作目录中的一个子目录,但 Git 还是会将它视作一个子模块。当你不在那个目录中时,Git 并不会跟踪它的内容, 而是将它看作该仓库中的一个特殊提交。
如果你想看到更漂亮的差异输出,可以给 git diff 传递 –submodule 选项。
$ git diff --cached --submodule
diff --git a/.gitmodules b/.gitmodules
new file mode 100644
index 0000000..71fc376
--- /dev/null
+++ b/.gitmodules
@@ -0,0 +1,3 @@
+[submodule "DbConnector"]
+       path = DbConnector
+       url = https://github.com/chaconinc/DbConnector
Submodule DbConnector 0000000...c3f01dc (new submodule)
当你提交时,会看到类似下面的信息:
$ git commit -am 'added DbConnector module'
[master fb9093c] added DbConnector module
 2 files changed, 4 insertions(+)
 create mode 100644 .gitmodules
 create mode 160000 DbConnector
注意 DbConnector 记录的 160000 模式。 这是 Git 中的一种特殊模式,它本质上意味着你是将一次提交记作一项目录记录的,而非将它记录成一个子目录或者一个文件。
克隆含有子模块的项目
接下来我们将会克隆一个含有子模块的项目。 当你在克隆这样的项目时,默认会包含该子模块目录,但其中还没有任何文件:
$ git clone https://github.com/chaconinc/MainProject
Cloning into 'MainProject'...
remote: Counting objects: 14, done.
remote: Compressing objects: 100% (13/13), done.
remote: Total 14 (delta 1), reused 13 (delta 0)
Unpacking objects: 100% (14/14), done.
Checking connectivity... done.
$ cd MainProject
$ ls -la
total 16
drwxr-xr-x   9 schacon  staff  306 Sep 17 15:21 .
drwxr-xr-x   7 schacon  staff  238 Sep 17 15:21 ..
drwxr-xr-x  13 schacon  staff  442 Sep 17 15:21 .git
-rw-r--r--   1 schacon  staff   92 Sep 17 15:21 .gitmodules
drwxr-xr-x   2 schacon  staff   68 Sep 17 15:21 DbConnector
-rw-r--r--   1 schacon  staff  756 Sep 17 15:21 Makefile
drwxr-xr-x   3 schacon  staff  102 Sep 17 15:21 includes
drwxr-xr-x   4 schacon  staff  136 Sep 17 15:21 scripts
drwxr-xr-x   4 schacon  staff  136 Sep 17 15:21 src
$ cd DbConnector/
$ ls
$
其中有 DbConnector 目录,不过是空的。 你必须运行两个命令:git submodule init 用来初始化本地配置文件,而 git submodule update 则从该项目中抓取所有数据并检出父项目中列出的合适的提交。
$ git submodule init
Submodule 'DbConnector' (https://github.com/chaconinc/DbConnector) registered for path 'DbConnector'
$ git submodule update
Cloning into 'DbConnector'...
remote: Counting objects: 11, done.
remote: Compressing objects: 100% (10/10), done.
remote: Total 11 (delta 0), reused 11 (delta 0)
Unpacking objects: 100% (11/11), done.
Checking connectivity... done.
Submodule path 'DbConnector': checked out 'c3f01dc8862123d317dd46284b05b6892c7b29bc'
现在 DbConnector 子目录是处在和之前提交时相同的状态了。
不过还有更简单一点的方式。 如果给 git clone 命令传递 –recursive 选项,它就会自动初始化并更新仓库中的每一个子模块。
$ git clone --recursive https://github.com/chaconinc/MainProject
Cloning into 'MainProject'...
remote: Counting objects: 14, done.
remote: Compressing objects: 100% (13/13), done.
remote: Total 14 (delta 1), reused 13 (delta 0)
Unpacking objects: 100% (14/14), done.
Checking connectivity... done.
Submodule 'DbConnector' (https://github.com/chaconinc/DbConnector) registered for path 'DbConnector'
Cloning into 'DbConnector'...
remote: Counting objects: 11, done.
remote: Compressing objects: 100% (10/10), done.
remote: Total 11 (delta 0), reused 11 (delta 0)
Unpacking objects: 100% (11/11), done.
Checking connectivity... done.
Submodule path 'DbConnector': checked out 'c3f01dc8862123d317dd46284b05b6892c7b29bc'
在包含子模块的项目上工作
现在我们有一份包含子模块的项目副本,我们将会同时在主项目和子模块项目上与队员协作。
拉取上游修改
在项目中使用子模块的最简模型,就是只使用子项目并不时地获取更新,而并不在你的检出中进行任何更改。 我们来看一个简单的例子。
如果想要在子模块中查看新工作,可以进入到目录中运行 git fetch 与 git merge,合并上游分支来更新本地代码。
$ git fetch
From https://github.com/chaconinc/DbConnector
   c3f01dc..d0354fc  master     -> origin/master
$ git merge origin/master
Updating c3f01dc..d0354fc
Fast-forward
 scripts/connect.sh | 1 +
 src/db.c           | 1 +
 2 files changed, 2 insertions(+)
如果你现在返回到主项目并运行 git diff –submodule,就会看到子模块被更新的同时获得了一个包含新添加提交的列表。 如果你不想每次运行 git diff 时都输入 –submodle,那么可以将diff.submodule 设置为 “log” 来将其作为默认行为。
$ git config --global diff.submodule log
$ git diff
Submodule DbConnector c3f01dc..d0354fc:
  > more efficient db routine
  > better connection routine
如果在此时提交,那么你会将子模块锁定为其他人更新时的新代码。
如果你不想在子目录中手动抓取与合并,那么还有种更容易的方式。 运行 git submodule update –remote,Git 将会进入子模块然后抓取并更新。
$ git submodule update --remote DbConnector
remote: Counting objects: 4, done.
remote: Compressing objects: 100% (2/2), done.
remote: Total 4 (delta 2), reused 4 (delta 2)
Unpacking objects: 100% (4/4), done.
From https://github.com/chaconinc/DbConnector
   3f19983..d0354fc  master     -> origin/master
Submodule path 'DbConnector': checked out 'd0354fc054692d3906c85c3af05ddce39a1c0644'
此命令默认会假定你想要更新并检出子模块仓库的 master 分支。 不过你也可以设置为想要的其他分支。 例如,你想要 DbConnector 子模块跟踪仓库的 “stable” 分支,那么既可以在 .gitmodules 文件中设置(这样其他人也可以跟踪它),也可以只在本地的 .git/config 文件中设置。 让我们在.gitmodules 文件中设置它:
$ git config -f .gitmodules submodule.DbConnector.branch stable

$ git submodule update --remote
remote: Counting objects: 4, done.
remote: Compressing objects: 100% (2/2), done.
remote: Total 4 (delta 2), reused 4 (delta 2)
Unpacking objects: 100% (4/4), done.
From https://github.com/chaconinc/DbConnector
   27cf5d3..c87d55d  stable -> origin/stable
Submodule path 'DbConnector': checked out 'c87d55d4c6d4b05ee34fbc8cb6f7bf4585ae6687'
如果不用 -f .gitmodules 选项,那么它只会为你做修改。但是在仓库中保留跟踪信息更有意义一些,因为其他人也可以得到同样的效果。
这时我们运行 git status,Git 会显示子模块中有 “新提交”。
$ git status
On branch master
Your branch is up-to-date with 'origin/master'.

Changes not staged for commit:
  (use "git add <file>..." to update what will be committed)
  (use "git checkout -- <file>..." to discard changes in working directory)

  modified:   .gitmodules
  modified:   DbConnector (new commits)

no changes added to commit (use "git add" and/or "git commit -a")
如果你设置了配置选项 status.submodulesummary,Git 也会显示你的子模块的更改摘要:
$ git config status.submodulesummary 1

$ git status
On branch master
Your branch is up-to-date with 'origin/master'.

Changes not staged for commit:
  (use "git add <file>..." to update what will be committed)
  (use "git checkout -- <file>..." to discard changes in working directory)

	modified:   .gitmodules
	modified:   DbConnector (new commits)

Submodules changed but not updated:

* DbConnector c3f01dc...c87d55d (4):
  > catch non-null terminated lines
这时如果运行 git diff,可以看到我们修改了 .gitmodules 文件,同时还有几个已拉取的提交需要提交到我们自己的子模块项目中。
$ git diff
diff --git a/.gitmodules b/.gitmodules
index 6fc0b3d..fd1cc29 100644
--- a/.gitmodules
+++ b/.gitmodules
@@ -1,3 +1,4 @@
 [submodule "DbConnector"]
        path = DbConnector
        url = https://github.com/chaconinc/DbConnector
+       branch = stable
 Submodule DbConnector c3f01dc..c87d55d:
  > catch non-null terminated lines
  > more robust error handling
  > more efficient db routine
  > better connection routine
这非常有趣,因为我们可以直接看到将要提交到子模块中的提交日志。 提交之后,你也可以运行 git log -p 查看这个信息。
$ git log -p --submodule
commit 0a24cfc121a8a3c118e0105ae4ae4c00281cf7ae
Author: Scott Chacon <schacon@gmail.com>
Date:   Wed Sep 17 16:37:02 2014 +0200

    updating DbConnector for bug fixes

diff --git a/.gitmodules b/.gitmodules
index 6fc0b3d..fd1cc29 100644
--- a/.gitmodules
+++ b/.gitmodules
@@ -1,3 +1,4 @@
 [submodule "DbConnector"]
        path = DbConnector
        url = https://github.com/chaconinc/DbConnector
+       branch = stable
Submodule DbConnector c3f01dc..c87d55d:
  > catch non-null terminated lines
  > more robust error handling
  > more efficient db routine
  > better connection routine
当运行 git submodule update –remote 时,Git 默认会尝试更新所有子模块,所以如果有很多子模块的话,你可以传递想要更新的子模块的名字。
在子模块上工作
你很有可能正在使用子模块,因为你确实想在子模块中编写代码的同时,还想在主项目上编写代码(或者跨子模块工作)。 否则你大概只能用简单的依赖管理系统(如 Maven 或 Rubygems)来替代了。
现在我们将通过一个例子来演示如何在子模块与主项目中同时做修改,以及如何同时提交与发布那些修改。
到目前为止,当我们运行 git submodule update 从子模块仓库中抓取修改时,Git 将会获得这些改动并更新子目录中的文件,但是会将子仓库留在一个称作 “游离的 HEAD” 的状态。 这意味着没有本地工作分支(例如 “master”)跟踪改动。 所以你做的任何改动都不会被跟踪。
为了将子模块设置得更容易进入并修改,你需要做两件事。 首先,进入每个子模块并检出其相应的工作分支。 接着,若你做了更改就需要告诉 Git 它该做什么,然后运行 git submodule update –remote来从上游拉取新工作。 你可以选择将它们合并到你的本地工作中,也可以尝试将你的工作变基到新的更改上。
首先,让我们进入子模块目录然后检出一个分支。
$ git checkout stable
Switched to branch 'stable'
然后尝试用 “merge” 选项。 为了手动指定它,我们只需给 update 添加 –merge 选项即可。 这时我们将会看到服务器上的这个子模块有一个改动并且它被合并了进来。
$ git submodule update --remote --merge
remote: Counting objects: 4, done.
remote: Compressing objects: 100% (2/2), done.
remote: Total 4 (delta 2), reused 4 (delta 2)
Unpacking objects: 100% (4/4), done.
From https://github.com/chaconinc/DbConnector
   c87d55d..92c7337  stable     -> origin/stable
Updating c87d55d..92c7337
Fast-forward
 src/main.c | 1 +
 1 file changed, 1 insertion(+)
Submodule path 'DbConnector': merged in '92c7337b30ef9e0893e758dac2459d07362ab5ea'
如果我们进入 DbConnector 目录,可以发现新的改动已经合并入本地 stable 分支。 现在让我们看看当我们对库做一些本地的改动而同时其他人推送另外一个修改到上游时会发生什么。
$ cd DbConnector/
$ vim src/db.c
$ git commit -am 'unicode support'
[stable f906e16] unicode support
 1 file changed, 1 insertion(+)
如果我们现在更新子模块,就会看到当我们在本地做了更改时上游也有一个改动,我们需要将它并入本地。
$ git submodule update --remote --rebase
First, rewinding head to replay your work on top of it...
Applying: unicode support
Submodule path 'DbConnector': rebased into '5d60ef9bbebf5a0c1c1050f242ceeb54ad58da94'
如果你忘记 –rebase 或 –merge,Git 会将子模块更新为服务器上的状态。并且会将项目重置为一个游离的 HEAD 状态。
$ git submodule update --remote
Submodule path 'DbConnector': checked out '5d60ef9bbebf5a0c1c1050f242ceeb54ad58da94'
即便这真的发生了也不要紧,你只需回到目录中再次检出你的分支(即还包含着你的工作的分支)然后手动地合并或变基 origin/stable(或任何一个你想要的远程分支)就行了。
如果你没有提交子模块的改动,那么运行一个子模块更新也不会出现问题,此时 Git 会只抓取更改而并不会覆盖子模块目录中未保存的工作。
$ git submodule update --remote
remote: Counting objects: 4, done.
remote: Compressing objects: 100% (3/3), done.
remote: Total 4 (delta 0), reused 4 (delta 0)
Unpacking objects: 100% (4/4), done.
From https://github.com/chaconinc/DbConnector
   5d60ef9..c75e92a  stable     -> origin/stable
error: Your local changes to the following files would be overwritten by checkout:
	scripts/setup.sh
Please, commit your changes or stash them before you can switch branches.
Aborting
Unable to checkout 'c75e92a2b3855c9e5b66f915308390d9db204aca' in submodule path 'DbConnector'
如果你做了一些与上游改动冲突的改动,当运行更新时 Git 会让你知道。
$ git submodule update --remote --merge
Auto-merging scripts/setup.sh
CONFLICT (content): Merge conflict in scripts/setup.sh
Recorded preimage for 'scripts/setup.sh'
Automatic merge failed; fix conflicts and then commit the result.
Unable to merge 'c75e92a2b3855c9e5b66f915308390d9db204aca' in submodule path 'DbConnector'
你可以进入子模块目录中然后就像平时那样修复冲突。
发布子模块改动
现在我们的子模块目录中有一些改动。 其中有一些是我们通过更新从上游引入的,而另一些是本地生成的,由于我们还没有推送它们,所以对任何其他人都不可用。
$ git diff
Submodule DbConnector c87d55d..82d2ad3:
  > Merge from origin/stable
  > updated setup script
  > unicode support
  > remove unnecessary method
  > add new option for conn pooling
如果我们在主项目中提交并推送但并不推送子模块上的改动,其他尝试检出我们修改的人会遇到麻烦,因为他们无法得到依赖的子模块改动。 那些改动只存在于我们本地的拷贝中。
为了确保这不会发生,你可以让 Git 在推送到主项目前检查所有子模块是否已推送。 git push 命令接受可以设置为 “check” 或 “on-demand” 的 –recurse-submodules 参数。 如果任何提交的子模块改动没有推送那么 “check” 选项会直接使 push 操作失败。
$ git push --recurse-submodules=check
The following submodule paths contain changes that can
not be found on any remote:
  DbConnector

Please try

	git push --recurse-submodules=on-demand

or cd to the path and use

	git push

to push them to a remote.
如你所见,它也给我们了一些有用的建议,指导接下来该如何做。 最简单的选项是进入每一个子模块中然后手动推送到远程仓库,确保它们能被外部访问到,之后再次尝试这次推送。
另一个选项是使用 “on-demand” 值,它会尝试为你这样做。
$ git push --recurse-submodules=on-demand
Pushing submodule 'DbConnector'
Counting objects: 9, done.
Delta compression using up to 8 threads.
Compressing objects: 100% (8/8), done.
Writing objects: 100% (9/9), 917 bytes | 0 bytes/s, done.
Total 9 (delta 3), reused 0 (delta 0)
To https://github.com/chaconinc/DbConnector
   c75e92a..82d2ad3  stable -> stable
Counting objects: 2, done.
Delta compression using up to 8 threads.
Compressing objects: 100% (2/2), done.
Writing objects: 100% (2/2), 266 bytes | 0 bytes/s, done.
Total 2 (delta 1), reused 0 (delta 0)
To https://github.com/chaconinc/MainProject
   3d6d338..9a377d1  master -> master
如你所见,Git 进入到 DbConnector 模块中然后在推送主项目前推送了它。 如果那个子模块因为某些原因推送失败,主项目也会推送失败。
合并子模块改动
如果你其他人同时改动了一个子模块引用,那么可能会遇到一些问题。 也就是说,如果子模块的历史已经分叉并且在父项目中分别提交到了分叉的分支上,那么你需要做一些工作来修复它。
如果一个提交是另一个的直接祖先(一个快进式合并),那么 Git 会简单地选择之后的提交来合并,这样没什么问题。
不过,Git 甚至不会尝试去进行一次简单的合并。 如果子模块提交已经分叉且需要合并,那你会得到类似下面的信息:
$ git pull
remote: Counting objects: 2, done.
remote: Compressing objects: 100% (1/1), done.
remote: Total 2 (delta 1), reused 2 (delta 1)
Unpacking objects: 100% (2/2), done.
From https://github.com/chaconinc/MainProject
   9a377d1..eb974f8  master     -> origin/master
Fetching submodule DbConnector
warning: Failed to merge submodule DbConnector (merge following commits not found)
Auto-merging DbConnector
CONFLICT (submodule): Merge conflict in DbConnector
Automatic merge failed; fix conflicts and then commit the result.
所以本质上 Git 在这里指出了子模块历史中的两个分支记录点已经分叉并且需要合并。 它将其解释为 “merge following commits not found”(未找到接下来需要合并的提交),虽然这有点令人困惑,不过之后我们会解释为什么是这样。
为了解决这个问题,你需要弄清楚子模块应该处于哪种状态。 奇怪的是,Git 并不会给你多少能帮你摆脱困境的信息,甚至连两边提交历史中的 SHA-1 值都没有。 幸运的是,这很容易解决。 如果你运行 git diff,就会得到试图合并的两个分支中记录的提交的 SHA-1 值。
$ git diff
diff --cc DbConnector
index eb41d76,c771610..0000000
--- a/DbConnector
+++ b/DbConnector
所以,在本例中,eb41d76 是我们的子模块中大家共有的提交,而 c771610 是上游拥有的提交。 如果我们进入子模块目录中,它应该已经在 eb41d76 上了,因为合并没有动过它。 如果不是的话,无论什么原因,你都可以简单地创建并检出一个指向它的分支。
来自另一边的提交的 SHA-1 值比较重要。 它是需要你来合并解决的。 你可以尝试直接通过 SHA-1 合并,也可以为它创建一个分支然后尝试合并。 我们建议后者,哪怕只是为了一个更漂亮的合并提交信息。
所以,我们将会进入子模块目录,基于 git diff 的第二个 SHA 创建一个分支然后手动合并。
$ cd DbConnector

$ git rev-parse HEAD
eb41d764bccf88be77aced643c13a7fa86714135

$ git branch try-merge c771610
(DbConnector) $ git merge try-merge
Auto-merging src/main.c
CONFLICT (content): Merge conflict in src/main.c
Recorded preimage for 'src/main.c'
Automatic merge failed; fix conflicts and then commit the result.
我们在这儿得到了一个真正的合并冲突,所以如果想要解决并提交它,那么只需简单地通过结果来更新主项目。
$ vim src/main.c
$ git add src/main.c
$ git commit -am 'merged our changes'
Recorded resolution for 'src/main.c'.
[master 9fd905e] merged our changes

$ cd ..
$ git diff
diff --cc DbConnector
index eb41d76,c771610..0000000
--- a/DbConnector
+++ b/DbConnector
@@@ -1,1 -1,1 +1,1 @@@
- Subproject commit eb41d764bccf88be77aced643c13a7fa86714135
 -Subproject commit c77161012afbbe1f58b5053316ead08f4b7e6d1d
++Subproject commit 9fd905e5d7f45a0d4cbc43d1ee550f16a30e825a
$ git add DbConnector

$ git commit -m "Merge Tom's Changes"
[master 10d2c60] Merge Tom's Changes

- 首先解决冲突

- 然后返回到主项目目录中

- 再次检查 SHA-1 值

- 解决冲突的子模块记录

- 提交我们的合并
这可能会让你有点儿困惑,但它确实不难。
有趣的是,Git 还能处理另一种情况。 如果子模块目录中存在着这样一个合并提交,它的历史中包含了的两边的提交,那么 Git 会建议你将它作为一个可行的解决方案。 它看到有人在子模块项目的某一点上合并了包含这两次提交的分支,所以你可能想要那个。
这就是为什么前面的错误信息是 “merge following commits not found”,因为它不能 这样 做。 它让人困惑是因为谁能想到它会尝试这样做?
如果它找到了一个可以接受的合并提交,你会看到类似下面的信息:
$ git merge origin/master
warning: Failed to merge submodule DbConnector (not fast-forward)
Found a possible merge resolution for the submodule:
 9fd905e5d7f45a0d4cbc43d1ee550f16a30e825a: > merged our changes
If this is correct simply add it to the index for example
by using:

  git update-index --cacheinfo 160000 9fd905e5d7f45a0d4cbc43d1ee550f16a30e825a "DbConnector"

which will accept this suggestion.
Auto-merging DbConnector
CONFLICT (submodule): Merge conflict in DbConnector
Automatic merge failed; fix conflicts and then commit the result.
它会建议你更新索引,就像你运行了 git add 那样,这样会清除冲突然后提交。不过你可能不应该这样做。你可以轻松地进入子模块目录,查看差异是什么,快进到这次提交,恰当地测试,然后提交它。
$ cd DbConnector/
$ git merge 9fd905e
Updating eb41d76..9fd905e
Fast-forward

$ cd ..
$ git add DbConnector
$ git commit -am 'Fast forwarded to a common submodule child'
这些命令完成了同一件事,但是通过这种方式你至少可以验证工作是否有效,以及当你在完成时可以确保子模块目录中有你的代码。
子模块技巧
你可以做几件事情来让用子模块工作轻松一点儿。
子模块遍历
有一个 foreach 子模块命令,它能在每一个子模块中运行任意命令。 如果项目中包含了大量子模块,这会非常有用。
例如,假设我们想要开始开发一项新功能或者修复一些错误,并且需要在几个子模块内工作。 我们可以轻松地保存所有子模块的工作进度。
$ git submodule foreach 'git stash'
Entering 'CryptoLibrary'
No local changes to save
Entering 'DbConnector'
Saved working directory and index state WIP on stable: 82d2ad3 Merge from origin/stable
HEAD is now at 82d2ad3 Merge from origin/stable
然后我们可以创建一个新分支,并将所有子模块都切换过去。
$ git submodule foreach 'git checkout -b featureA'
Entering 'CryptoLibrary'
Switched to a new branch 'featureA'
Entering 'DbConnector'
Switched to a new branch 'featureA'
你应该明白。 能够生成一个主项目与所有子项目的改动的统一差异是非常有用的。
$ git diff; git submodule foreach 'git diff'
Submodule DbConnector contains modified content
diff --git a/src/main.c b/src/main.c
index 210f1ae..1f0acdc 100644
--- a/src/main.c
+++ b/src/main.c
@@ -245,6 +245,8 @@ static int handle_alias(int *argcp, const char ***argv)

      commit_pager_choice();

+     url = url_decode(url_orig);
+
      /* build alias_argv */
      alias_argv = xmalloc(sizeof(*alias_argv) * (argc + 1));
      alias_argv[0] = alias_string + 1;
Entering 'DbConnector'
diff --git a/src/db.c b/src/db.c
index 1aaefb6..5297645 100644
--- a/src/db.c
+++ b/src/db.c
@@ -93,6 +93,11 @@ char *url_decode_mem(const char *url, int len)
        return url_decode_internal(&url, len, NULL, &out, 0);
 }

+char *url_decode(const char *url)
+{
+       return url_decode_mem(url, strlen(url));
+}
+
 char *url_decode_parameter_name(const char **query)
 {
        struct strbuf out = STRBUF_INIT;
在这里,我们看到子模块中定义了一个函数并在主项目中调用了它。 这明显是个简化了的例子,但是希望它能让你明白这种方法的用处。
有用的别名
你可能想为其中一些命令设置别名,因为它们可能会非常长而你又不能设置选项作为它们的默认选项。 我们在 Git 别名 介绍了设置 Git 别名,但是如果你计划在 Git 中大量使用子模块的话,这里有一些例子。
$ git config alias.sdiff '!'"git diff && git submodule foreach 'git diff'"
$ git config alias.spush 'push --recurse-submodules=on-demand'
$ git config alias.supdate 'submodule update --remote --merge'
这样当你想要更新子模块时可以简单地运行 git supdate,或 git spush 检查子模块依赖后推送。
子模块的问题
然而使用子模块还是有一些小问题。
例如在有子模块的项目中切换分支可能会造成麻烦。 如果你创建一个新分支,在其中添加一个子模块,之后切换到没有该子模块的分支上时,你仍然会有一个还未跟踪的子模块目录。
$ git checkout -b add-crypto
Switched to a new branch 'add-crypto'

$ git submodule add https://github.com/chaconinc/CryptoLibrary
Cloning into 'CryptoLibrary'...
...

$ git commit -am 'adding crypto library'
[add-crypto 4445836] adding crypto library
 2 files changed, 4 insertions(+)
 create mode 160000 CryptoLibrary

$ git checkout master
warning: unable to rmdir CryptoLibrary: Directory not empty
Switched to branch 'master'
Your branch is up-to-date with 'origin/master'.

$ git status
On branch master
Your branch is up-to-date with 'origin/master'.

Untracked files:
  (use "git add <file>..." to include in what will be committed)

	CryptoLibrary/

nothing added to commit but untracked files present (use "git add" to track)
移除那个目录并不困难,但是有一个目录在那儿会让人有一点困惑。 如果你移除它然后切换回有那个子模块的分支,需要运行 submodule update –init 来重新建立和填充。
$ git clean -fdx
Removing CryptoLibrary/

$ git checkout add-crypto
Switched to branch 'add-crypto'

$ ls CryptoLibrary/

$ git submodule update --init
Submodule path 'CryptoLibrary': checked out 'b8dda6aa182ea4464f3f3264b11e0268545172af'

$ ls CryptoLibrary/
Makefile	includes	scripts		src
再说一遍,这真的不难,只是会让人有点儿困惑。
另一个主要的告诫是许多人遇到了将子目录转换为子模块的问题。 如果你在项目中已经跟踪了一些文件,然后想要将它们移动到一个子模块中,那么请务必小心,否则 Git 会对你发脾气。 假设项目内有一些文件在子目录中,你想要将其转换为一个子模块。 如果删除子目录然后运行 submodule add,Git 会朝你大喊:
$ rm -Rf CryptoLibrary/
$ git submodule add https://github.com/chaconinc/CryptoLibrary
'CryptoLibrary' already exists in the index
你必须要先取消暂存 CryptoLibrary 目录。 然后才可以添加子模块:
$ git rm -r CryptoLibrary
$ git submodule add https://github.com/chaconinc/CryptoLibrary
Cloning into 'CryptoLibrary'...
remote: Counting objects: 11, done.
remote: Compressing objects: 100% (10/10), done.
remote: Total 11 (delta 0), reused 11 (delta 0)
Unpacking objects: 100% (11/11), done.
Checking connectivity... done.
现在假设你在一个分支下做了这样的工作。 如果尝试切换回的分支中那些文件还在子目录而非子模块中时 – 你会得到这个错误:
$ git checkout master
error: The following untracked working tree files would be overwritten by checkout:
  CryptoLibrary/Makefile
  CryptoLibrary/includes/crypto.h
  ...
Please move or remove them before you can switch branches.
Aborting
你可以通过 check -f 来强制切换,但是要小心,如果其中还有未保存的修改,这个命令会把它们覆盖掉。
$ git checkout -f master
warning: unable to rmdir CryptoLibrary: Directory not empty
Switched to branch 'master'
当你切换回来之后,因为某些原因你得到了一个空的 CryptoLibrary 目录,并且 git submodule update 也无法修复它。 你需要进入到子模块目录中运行 git checkout . 来找回所有的文件。 你也可以通过 submodule foreach 脚本来为多个子模块运行它。
要特别注意的是,近来子模块会将它们的所有 Git 数据保存在顶级项目的 .git 目录中,所以不像旧版本的 Git,摧毁一个子模块目录并不会丢失任何提交或分支。
拥有了这些工具,使用子模块会成为可以在几个相关但却分离的项目上同时开发的相当简单有效的方法。
7.12 Git 工具 – 打包
打包
虽然我们已经了解了网络传输 Git 数据的常用方法(如 HTTP,SSH 等),但还有另外一种不太常见却又十分有用的方式。
Git 可以将它的数据 “打包” 到一个文件中。 这在许多场景中都很有用。 有可能你的网络中断了,但你又希望将你的提交传给你的合作者们。 可能你不在办公网中并且出于安全考虑没有给你接入内网的权限。 可能你的无线、有线网卡坏掉了。 可能你现在没有共享服务器的权限,你又希望通过邮件将更新发送给别人,却不希望通过 format-patch 的方式传输 40 个提交。
这些情况下 git bundle 就会很有用。 bundle 命令会将 git push 命令所传输的所有内容打包成一个二进制文件,你可以将这个文件通过邮件或者闪存传给其他人,然后解包到其他的仓库中。
来看看一个简单的例子。 假设你有一个包含两个提交的仓库:
$ git log
commit 9a466c572fe88b195efd356c3f2bbeccdb504102
Author: Scott Chacon <schacon@gmail.com>
Date:   Wed Mar 10 07:34:10 2010 -0800

    second commit

commit b1ec3248f39900d2a406049d762aa68e9641be25
Author: Scott Chacon <schacon@gmail.com>
Date:   Wed Mar 10 07:34:01 2010 -0800

    first commit
如果你想把这个仓库发送给其他人但你没有其他仓库的权限,或者就是懒得新建一个仓库,你就可以用git bundle create 命令来打包。
$ git bundle create repo.bundle HEAD master
Counting objects: 6, done.
Delta compression using up to 2 threads.
Compressing objects: 100% (2/2), done.
Writing objects: 100% (6/6), 441 bytes, done.
Total 6 (delta 0), reused 0 (delta 0)
然后你就会有一个名为 repo.bundle 的文件,该文件包含了所有重建该仓库 master 分支所需的数据。 在使用 bundle 命令时,你需要列出所有你希望打包的引用或者提交的区间。 如果你希望这个仓库可以在别处被克隆,你应该像例子中那样增加一个 HEAD 引用。
你可以将这个 repo.bundle 文件通过邮件或者U盘传给别人。
另一方面,假设别人传给你一个 repo.bundle 文件并希望你在这个项目上工作。 你可以从这个二进制文件中克隆出一个目录,就像从一个 URL 克隆一样。
$ git clone repo.bundle repo
Initialized empty Git repository in /private/tmp/bundle/repo/.git/
$ cd repo
$ git log --oneline
9a466c5 second commit
b1ec324 first commit
如果你在打包时没有包含 HEAD 引用,你还需要在命令后指定一个 -b master 或者其他被引入的分支,否则 Git 不知道应该检出哪一个分支。
现在假设你提交了 3 个修订,并且要用邮件或者U盘将新的提交放在一个包里传回去。
$ git log --oneline
71b84da last commit - second repo
c99cf5b fourth commit - second repo
7011d3d third commit - second repo
9a466c5 second commit
b1ec324 first commit
首先我们需要确认我们希望被打包的提交区间。 和网络协议不太一样,网络协议会自动计算出所需传输的最小数据集,而我们需要手动计算。 当然你可以像上面那样将整个仓库打包,但最好仅仅打包变更的部分 —— 就是我们刚刚在本地做的 3 个提交。
为了实现这个目标,你需要计算出差别。 就像我们在 提交区间 介绍的,你有很多种方式去指明一个提交区间。 我们可以使用 origin/master..master 或者 master ^origin/master 之类的方法来获取那 3 个在我们的 master 分支而不在原始仓库中的提交。 你可以用 log 命令来测试。
$ git log --oneline master ^origin/master
71b84da last commit - second repo
c99cf5b fourth commit - second repo
7011d3d third commit - second repo
这样就获取到我们希望被打包的提交列表,让我们将这些提交打包。 我们可以用 git bundle create命令,加上我们想用的文件名,以及要打包的提交区间。
$ git bundle create commits.bundle master ^9a466c5
Counting objects: 11, done.
Delta compression using up to 2 threads.
Compressing objects: 100% (3/3), done.
Writing objects: 100% (9/9), 775 bytes, done.
Total 9 (delta 0), reused 0 (delta 0)
现在在我们的目录下会有一个 commits.bundle 文件。 如果我们把这个文件发送给我们的合作者,她可以将这个文件导入到原始的仓库中,即使在这期间已经有其他的工作提交到这个仓库中。
当她拿到这个包时,她可以在导入到仓库之前查看这个包里包含了什么内容。 bundle verify 命令可以检查这个文件是否是一个合法的 Git 包,是否拥有共同的祖先来导入。
$ git bundle verify ../commits.bundle
The bundle contains 1 ref
71b84daaf49abed142a373b6e5c59a22dc6560dc refs/heads/master
The bundle requires these 1 ref
9a466c572fe88b195efd356c3f2bbeccdb504102 second commit
../commits.bundle is okay
如果打包工具仅仅把最后两个提交打包,而不是三个,原始的仓库是无法导入这个包的,因为这个包缺失了必要的提交记录。这时候 verify 的输出类似:
$ git bundle verify ../commits-bad.bundle
error: Repository lacks these prerequisite commits:
error: 7011d3d8fc200abe0ad561c011c3852a4b7bbe95 third commit - second repo
而我们的第一个包是合法的,所以我们可以从这个包里提取出提交。 如果你想查看这边包里可以导入哪些分支,同样有一个命令可以列出这些顶端:
$ git bundle list-heads ../commits.bundle
71b84daaf49abed142a373b6e5c59a22dc6560dc refs/heads/master
verify 子命令同样可以告诉你有哪些顶端。 该功能的目的是查看哪些是可以被拉入的,所以你可以使用 fetch 或者 pull 命令从包中导入提交。 这里我们要从包中取出 master 分支到我们仓库中的other-master 分支:
$ git fetch ../commits.bundle master:other-master
From ../commits.bundle
 * [new branch]      master     -> other-master
可以看到我们已经将提交导入到 other-master 分支,以及在这期间我们自己在 master 分支上的提交。
$ git log --oneline --decorate --graph --all
* 8255d41 (HEAD, master) third commit - first repo
| * 71b84da (other-master) last commit - second repo
| * c99cf5b fourth commit - second repo
| * 7011d3d third commit - second repo
|/
* 9a466c5 second commit
* b1ec324 first commit
因此,当你在没有合适的网络或者可共享仓库的情况下,git bundle 很适合用于共享或者网络类型的操作。
7.13 Git 工具 – 替换
替换
Git 对象是不可改变的,但它提供一种有趣的方式来用其他对象假装替换数据库中的 Git 对象。
replace 命令可以让你在 Git 中指定一个对象并可以声称“每次你遇到这个 Git 对象时,假装它是其他的东西”。 在你用一个不同的提交替换历史中的一个提交时,这会非常有用。
例如,你有一个大型的代码历史并想把自己的仓库分成一个短的历史和一个更大更长久的历史,短历史供新的开发者使用,后者给喜欢数据挖掘的人使用。 你可以通过用新仓库中最早的提交 replace 老仓库中最新的提交来连接历史,这种方式可以把一条历史移植到其他历史上。 这意味着你不用在新历史中真正替换每一个提交(因为历史来源会影响 SHA 的值),你可以加入他们。
让我们来试试吧。 首先获取一个已经存在的仓库,并将其分成两个仓库,一个是最近的仓库,一个是历史版本的仓库,然后我们将看到如何在不更改仓库 SHA 值的情况下通过 replace 命令来合并他们。
我们将使用一个拥有 5 个提交的简单仓库:
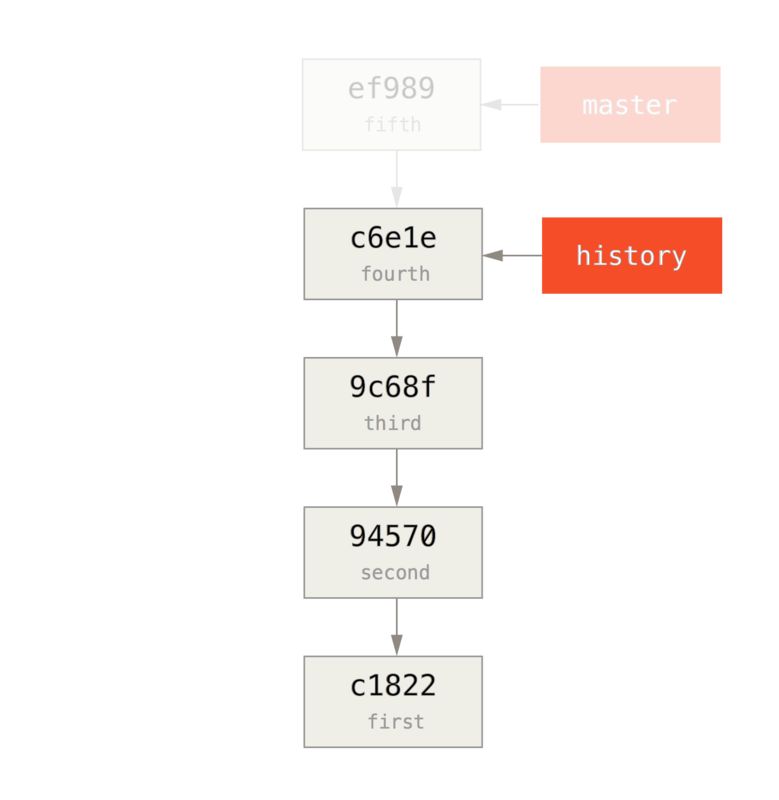
$ git log --oneline
ef989d8 fifth commit
c6e1e95 fourth commit
9c68fdc third commit
945704c second commit
c1822cf first commit
我们想将其分成拆分成两条历史。 第一个到第四个提交的作为第一个历史版本。 第四、第五个提交的作为最近的第二个历史版本。

创建历史版本的历史很容易,我们可以只将一个历史中的分支推送到一个新的远程仓库的 master 分支。
$ git branch history c6e1e95
$ git log --oneline --decorate
ef989d8 (HEAD, master) fifth commit
c6e1e95 (history) fourth commit
9c68fdc third commit
945704c second commit
c1822cf first commit
现在我们可以把这个新的 history 分支推送到我们新仓库的 master 分支:
$ git remote add project-history https://github.com/schacon/project-history
$ git push project-history history:master
Counting objects: 12, done.
Delta compression using up to 2 threads.
Compressing objects: 100% (4/4), done.
Writing objects: 100% (12/12), 907 bytes, done.
Total 12 (delta 0), reused 0 (delta 0)
Unpacking objects: 100% (12/12), done.
To git@github.com:schacon/project-history.git
 * [new branch]      history -> master
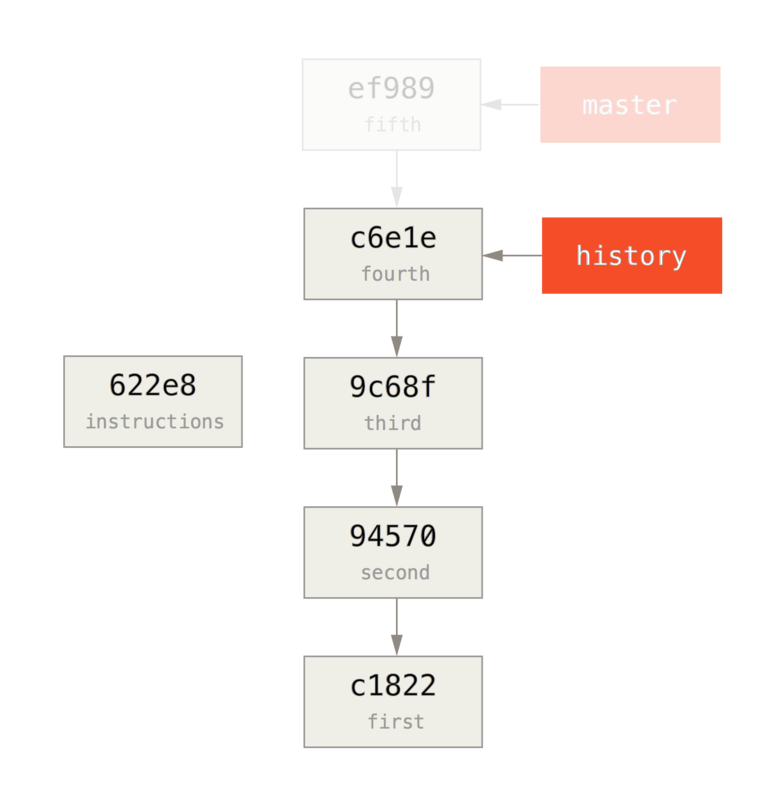
这样一来,我们的历史版本就发布了。 稍难的部分则是删减我们最近的历史来让它变得更小。 我们需要一个重叠以便于用一个相等的提交来替换另一个提交,这样一来,我们将截断到第四、五个提交。
$ git log --oneline --decorate
ef989d8 (HEAD, master) fifth commit
c6e1e95 (history) fourth commit
9c68fdc third commit
945704c second commit
c1822cf first commit
在这种情况下,创建一个能够指导扩展历史的基础提交是很有用的。 这样一来,如果其他的开发者想要修改第一次提交或者其他操作时就知道要做些什么,因此,接下来我们要做的是用命令创建一个最初的提交对象,然后将剩下的提交(第四、第五个提交)变基到它的上面。
为了这么做,我们需要选择一个点去拆分,对于我们而言是第三个提交(SHA 是 9c68fdc)。因此我们的提交将基于此提交树。我们可以使用 commit-tree 命令来创建基础提交,这样我们就有了一个树,并返回一个全新的、无父节点的 SHA 提交对象。
$ echo 'get history from blah blah blah' | git commit-tree 9c68fdc^{tree}
622e88e9cbfbacfb75b5279245b9fb38dfea10cf
NOTE
commit-tree 命令属于底层指令。有许多指令并非直接使用,而是被 其他的 Git 命令用来做更小一些的工作。有时当我们做一些像这样的奇怪事情时,它们允许我们做一些不适用于日常使用但真正底层的东西。更多关于底层命令的内容请参见 底层命令和高层命令
现在我们已经有一个基础提交了,我们可以通过 git rebase –onto 命令来将剩余的历史变基到基础提交之上。–onto 参数是刚才 commit-tree 命令返回的 SHA 值,变基点会成为第三个提交(我们想留下的第一个提交的父提交,9c68fdc):
$ git rebase --onto 622e88 9c68fdc
First, rewinding head to replay your work on top of it...
Applying: fourth commit
Applying: fifth commit
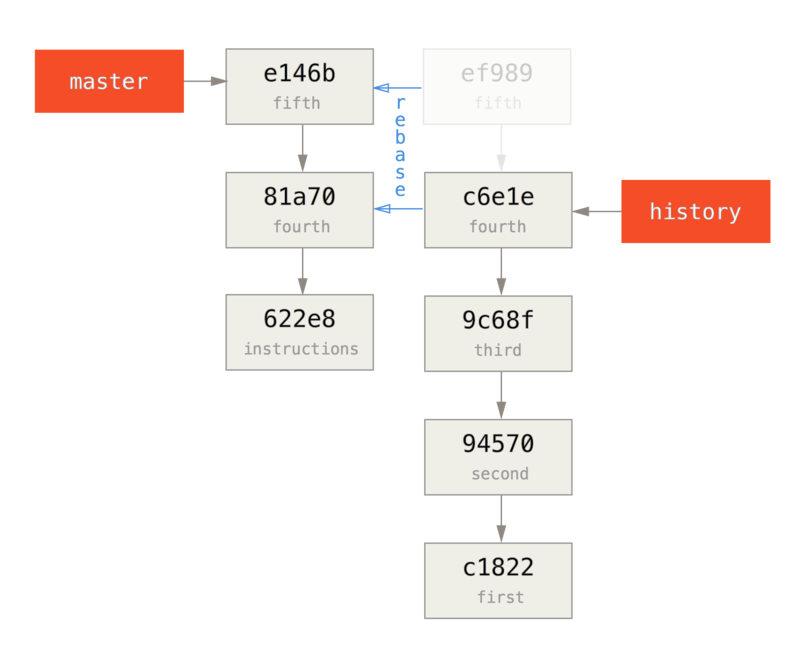
我们已经用基础提交重写了最近的历史,基础提交包括如何重新组成整个历史的说明。 我们可以将新历史推送到新项目中,当其他人克隆这个仓库时,他们仅能看到最近两次提交以及一个包含上述说明的基础提交。
现在我们将以想获得整个历史的人的身份来初次克隆这个项目。 在克隆这个截断后的仓库后为了得到历史数据,需要添加第二个远程的历史版本库并对其做获取操作:
$ git clone https://github.com/schacon/project
$ cd project

$ git log --oneline master
e146b5f fifth commit
81a708d fourth commit
622e88e get history from blah blah blah

$ git remote add project-history https://github.com/schacon/project-history
$ git fetch project-history
From https://github.com/schacon/project-history
 * [new branch]      master     -> project-history/master
现在,协作者在 master 分支中拥有他们最近的提交并且在 project-history/master 分支中拥有过去的提交。
$ git log --oneline master
e146b5f fifth commit
81a708d fourth commit
622e88e get history from blah blah blah

$ git log --oneline project-history/master
c6e1e95 fourth commit
9c68fdc third commit
945704c second commit
c1822cf first commit
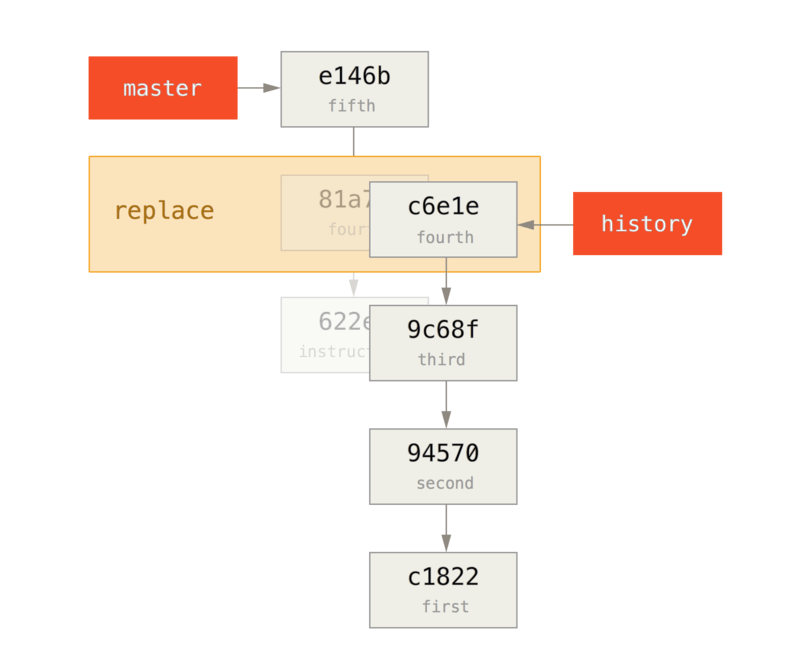
为了合并它们,你可以使用 git replace 命令加上你想替换的提交信息来进行替换。 这样一来,我们就可以将 master 分支中的第四个提交替换为 project-history/master 分支中的“第四个”提交。
$ git replace 81a708d c6e1e95
现在,查看 master 分支中的历史信息,显示如下:
$ git log --oneline master
e146b5f fifth commit
81a708d fourth commit
9c68fdc third commit
945704c second commit
c1822cf first commit
很酷,是不是?不用改变上游的 SHA-1 我们就能用一个提交来替换历史中的所有不同的提交,并且所有的工具(bisect,blame 等)也都奏效。
有趣的是,即使是使用了 c6e1e95 提交数据来进行替换,它的 SHA-1 仍显示为 81a708d。 即使你运行了 cat-file 命令,它仍会显示你替换的数据:
$ git cat-file -p 81a708d
tree 7bc544cf438903b65ca9104a1e30345eee6c083d
parent 9c68fdceee073230f19ebb8b5e7fc71b479c0252
author Scott Chacon <schacon@gmail.com> 1268712581 -0700
committer Scott Chacon <schacon@gmail.com> 1268712581 -0700

fourth commit
请记住,81a708d 真正的父提交是 622e882 占位提交,而非呈现的 9c68fdce 提交。
另一个有趣的事情是数据将会以以下引用显示:
$ git for-each-ref
e146b5f14e79d4935160c0e83fb9ebe526b8da0d commit	refs/heads/master
c6e1e95051d41771a649f3145423f8809d1a74d4 commit	refs/remotes/history/master
e146b5f14e79d4935160c0e83fb9ebe526b8da0d commit	refs/remotes/origin/HEAD
e146b5f14e79d4935160c0e83fb9ebe526b8da0d commit	refs/remotes/origin/master
c6e1e95051d41771a649f3145423f8809d1a74d4 commit	refs/replace/81a708dd0e167a3f691541c7a6463343bc457040
这意味着我们可以轻而易举的和其他人分享替换,因为我们可以将替换推送到服务器中并且其他人可以轻松地下载。 也许在历史移植情况下不是很有用(既然每个人都乐意下载最新版本和历史版本,为何还要拆分他们呢?),但在其他情况下仍然很有用。
7.14 Git 工具 – 凭证存储
凭证存储
如果你使用的是 SSH 方式连接远端,并且设置了一个没有口令的密钥,这样就可以在不输入用户名和密码的情况下安全地传输数据。 然而,这对 HTTP 协议来说是不可能的 —— 每一个连接都是需要用户名和密码的。 这在使用双重认证的情况下会更麻烦,因为你需要输入一个随机生成并且毫无规律的 token 作为密码。
幸运的是,Git 拥有一个凭证系统来处理这个事情。 下面有一些 Git 的选项:
- 默认所有都不缓存。 每一次连接都会询问你的用户名和密码。
- “cache” 模式会将凭证存放在内存中一段时间。 密码永远不会被存储在磁盘中,并且在15分钟后从内存中清除。
- “store” 模式会将凭证用明文的形式存放在磁盘中,并且永不过期。 这意味着除非你修改了你在 Git 服务器上的密码,否则你永远不需要再次输入你的凭证信息。 这种方式的缺点是你的密码是用明文的方式存放在你的 home 目录下。
- 如果你使用的是 Mac,Git 还有一种 “osxkeychain” 模式,它会将凭证缓存到你系统用户的钥匙串中。 这种方式将凭证存放在磁盘中,并且永不过期,但是是被加密的,这种加密方式与存放 HTTPS 凭证以及 Safari 的自动填写是相同的。
- 如果你使用的是 Windows,你可以安装一个叫做 “winstore” 的辅助工具。 这和上面说的 “osxkeychain” 十分类似,但是是使用 Windows Credential Store 来控制敏感信息。 可以在https://gitcredentialstore.codeplex.com 下载。
你可以设置 Git 的配置来选择上述的一种方式
$ git config --global credential.helper cache
部分辅助工具有一些选项。 “store” 模式可以接受一个 –file <path> 参数,可以自定义存放密码的文件路径(默认是~/.git-credentials)。 “cache” 模式有 –timeout <seconds> 参数,可以设置后台进程的存活时间(默认是 “900”,也就是 15 分钟)。 下面是一个配置 “store” 模式自定义路径的例子:
$ git config --global credential.helper store --file ~/.my-credentials
Git 甚至允许你配置多个辅助工具。 当查找特定服务器的凭证时,Git 会按顺序查询,并且在找到第一个回答时停止查询。 当保存凭证时,Git 会将用户名和密码发送给 所有 配置列表中的辅助工具,它们会按自己的方式处理用户名和密码。 如果你在闪存上有一个凭证文件,但又希望在该闪存被拔出的情况下使用内存缓存来保存用户名密码,.gitconfig 配置文件如下:
[credential]
    helper = store --file /mnt/thumbdrive/.git-credentials
    helper = cache --timeout 30000
底层实现
这些是如何实现的呢? Git 凭证辅助工具系统的命令是 git credential,这个命令接收一个参数,并通过标准输入获取更多的参数。
举一个例子更容易理解。 我们假设已经配置好一个凭证辅助工具,这个辅助工具保存了 mygithost 的凭证信息。 下面是一个使用 “fill” 命令的会话,当 Git 尝试寻找一个服务器的凭证时就会被调用。
$ git credential fill
protocol=https
host=mygithost

protocol=https
host=mygithost
username=bob
password=s3cre7
$ git credential fill
protocol=https
host=unknownhost

Username for 'https://unknownhost': bob
Password for 'https://bob@unknownhost':
protocol=https
host=unknownhost
username=bob
password=s3cre7
- 这是开始交互的命令。
- Git-credential 接下来会等待标准输入。 我们提供我们所知道的信息:协议和主机名。
- 一个空行代表输入已经完成,凭证系统应该输出它所知道的信息。
- 接下来由 Git-credential 接管,并且将找到的信息打印到标准输出。
- 如果没有找到对应的凭证,Git 会询问用户的用户名和密码,我们将这些信息输入到在标准输出的地方(这个例子中是同一个控制台)。
凭证系统实际调用的程序和 Git 本身是分开的;具体是哪一个以及如何调用与 credential.helper 配置的值有关。 这个配置有多种格式:
| 配置值 | 行为 |
|---|---|
| foo | 执行 git-credential-foo |
| foo -a –opt=bcd | 执行 git-credential-foo -a –opt=bcd |
| /absolute/path/foo -xyz | 执行 /absolute/path/foo -xyz |
| !f() { echo “password=s3cre7”; }; f | ! 后面的代码会在shell执行 |
上面描述的辅助工具可以被称做 git-credential-cache、git-credential-store 之类,我们可以配置它们来接受命令行参数。 通常的格式是 “git-credential-foo [args] <action>.” 标准输入/输出协议和 git-credential 一样,但它们使用的是一套稍微不太一样的行为:
- get 是请求输入一对用户名和密码。
- store 是请求保存一个凭证到辅助工具的内存。
- erase 会将给定的证书从辅助工具内存中清除。
对于 store 和 erase 两个行为是不需要返回数据的(Git 也会忽略掉)。 然而对于 get,Git 对辅助工具的返回信息十分感兴趣。
如果辅助工具没有任何有用的信息,它可以直接退出而不需要输出任何东西,但如果它有这些信息,它在提供的信息后面增加它所拥有的信息。 这些输出会被视为一系列的赋值语句;每一个提供的数据都会将 Git 已有的数据替换掉。
这有一个和上面一样的例子,但是跳过了 git-credential 这一步,直接到 git-credential-store:
$ git credential-store --file ~/git.store store
protocol=https
host=mygithost
username=bob
password=s3cre7
$ git credential-store --file ~/git.store get
protocol=https
host=mygithost

username=bob
password=s3cre7
- 我们告诉 git-credential-store 去保存凭证:当访问 https://mygithost 时使用用户名 “bob”,密码是 “s3cre7”。
- 现在我们取出这个凭证。 我们提供连接这部分的信息(https://mygithost)以及一个空行。
- git-credential-store 输出我们之前保存的用户名和密码。
~/git.store 文件的内容类似:
https://bob:s3cre7@mygithost
仅仅是一系列包含凭证信息URL组成的行。 osxkeychain 和 winstore 辅助工具使用它们后端存储的原生格式,而 cache 使用它的内存格式(其他进程无法读取)。
自定义凭证缓存
已经知道 git-credential-store 之类的是和 Git 是相互独立的程序,就不难理解 Git 凭证辅助工具可以是 任意 程序。 虽然 Git 提供的辅助工具覆盖了大多数常见的使用场景,但并不能满足所有情况。 比如,假设你的整个团队共享一些凭证,也许是在部署时使用。 这些凭证是保存在一个共享目录里,由于这些凭证经常变更,所以你不想把它们复制到你自己的凭证仓库中。 现有的辅助工具无法满足这种情况;来看看我们如何自己实现一个。 这个程序应该拥有几个核心功能:
- 我们唯一需要关注的行为是 get;store 和 erase 是写操作,所以当接受到这两个请求时我们直接退出即可。
- 共享的凭证文件格式和 git-credential-store 使用的格式相同。
- 凭证文件的路径一般是固定的,但我们应该允许用户传入一个自定义路径以防万一。
我们再一次使用 Ruby 来编写这个扩展,但只要 Git 能够执行最终的程序,任何语言都是可以的。 这是我们的凭证辅助工具的完整代码:
#!/usr/bin/env ruby

require 'optparse'

path = File.expand_path '~/.git-credentials'
OptionParser.new do |opts|
    opts.banner = 'USAGE: git-credential-read-only [options] <action>'
    opts.on('-f', '--file PATH', 'Specify path for backing store') do |argpath|
        path = File.expand_path argpath
    end
end.parse!

exit(0) unless ARGV[0].downcase == 'get'
exit(0) unless File.exists? path

known = {}
while line = STDIN.gets
    break if line.strip == ''
    k,v = line.strip.split '=', 2
    known[k] = v
end

File.readlines(path).each do |fileline|
    prot,user,pass,host = fileline.scan(/^(.*?):\/\/(.*?):(.*?)@(.*)$/).first
    if prot == known['protocol'] and host == known['host'] then
        puts "protocol=#{prot}"
        puts "host=#{host}"
        puts "username=#{user}"
        puts "password=#{pass}"
        exit(0)
    end
end
- 我们在这里解析命令行参数,允许用户指定输入文件,默认是 ~/.git-credentials.
- 这个程序只有在接受到 get 行为的请求并且后端存储的文件存在时才会有输出。
- 这个循环从标准输入读取数据,直到读取到第一个空行。 输入的数据被保存到 known 哈希表中,之后需要用到。
- 这个循环读取存储文件中的内容,寻找匹配的行。 如果 known 中的协议和主机名与该行相匹配,这个程序输出结果并退出。
我们把这个辅助工具保存为 git-credential-read-only,放到我们的 PATH 路径下并且给予执行权限。 一个交互式会话类似:
$ git credential-read-only --file=/mnt/shared/creds get
protocol=https
host=mygithost

protocol=https
host=mygithost
username=bob
password=s3cre7
由于这个的名字是 “git-” 开头,所以我们可以在配置值中使用简便的语法:
$ git config --global credential.helper read-only --file /mnt/shared/creds
正如你看到的,扩展这个系统是相当简单的,并且可以为你和你的团队解决一些常见问题。
7.15 Git 工具 – 总结
总结
你已经接触了很多能够精确地操控提交和暂存区的高级工具。 当你碰到问题时,你应该可以很容易找出是哪个分支在什么时候由谁引入了它们。 如果你想在项目中使用子项目,你也已经知道如何来满足这些需求。 到此,你应该能毫无压力地在命令行中使用 Git 来完成日常中的大部分事情。